As a brief aside before the food part, I don't have anything particularly wise to say about games wod #2. I do however wish to point out all of the most excellent efforts that went on at my gym. The plethora of people getting new max snatches under pressure was amazing. This was just the reason I was encouraging everyone to participate! so many people ended up surpassing their own expectations and, as usual, the support from everyone was outstanding. The atmosphere on games day is my favourite thing about the whole process :) Now if only someone could give me a cure for my compulsion to check the leaderboard constantly. Also, if someone could maybe go back in time and tell me to go to olympic lifting classes a bit more regularly so I could do a 100 lb snatch that would be super.
So food.
My mom used to make this tasty dish where she threw rice, porkchops, and cream of mushroom soup in a casserole dish in the oven. I had a craving for it last week and decided to try my own version. I didn't have a recipe so there was a large risk of wasting a can of coconut milk and two chicken breasts, not to mention being left without edible dinner, but it turned out splendidly. The coconut milk as a substitute for cream was not too coconutty, as I'd feared it might be, and the mushroom flavour was lovely.
"Cream" of mushroom soup with Chicken (and possibly "rice")
The prep for this is really quick, but you do have to leave it in the oven for a while. If I'd had more prep time I would have added cauliflower rice to the casserole but I was in a hurry.
Ingredients
2 chicken breasts, boneless/skinless (I think porkchops would also be yummy)
1 can coconut milk (and equal part water)
lots of mushrooms (I used cremini)
green pepper (or red, or some other vegetable you think might taste good)
salt and pepper to taste
garlic and onion powder, also to taste
green onions (would have added them if I'd had any)
cauliflower, riced (optional)
1. In a casserole dish, mix the coconut milk and water (less or more water depending how thick you like your soup). Use a dish of a size that the chicken/chops will be covered by liquid.
2. Chop up the mushrooms and green peppers and add to the casserole
3. Season with salt, pepper, garlic powder, and onion powder. Stir it up and add the chicken breasts.
4. If you want "rice", mulch up your cauliflower and add it too. I haven't made the dish with the cauliflower rice before, so I'm not sure about how much to add to keep the liquid ratio optimal. I think it would taste lovely though. Let me know if you try it!
5. Bake at about 350 for 30-40 minutes depending how thick your meat pieces are.
6. I think some green onions would garnish the dish nicely, but I had none.
Showing posts with label coconut milk. Show all posts
Monday, 5 March 2012
Thursday, 26 January 2012
Spicy Citrus Coconut Chicken
I started out thinking I would make a creamy mushroom sauce for my chicken. But then I remembered I had some clementines threatening to shrivel, and no body wants to waste a good clementine (don't you hate when you pick one up that looks great on one side, just to find that it's covered in blue mold on the underside and threatening to contaminate the rest of the basket with its grossness?). So, I ditched the mushrooms, kept the creamy sauce part, and came up with this delightful concoction, if I do say so myself. It looks a little bland in colour because by the time I remembered about the red peppers I had planned to add, everything else was all ready. Also, I forgot the ginger, and felt the whole thing was slightly lacking, but I added it to my leftovers, and happily my lunch the next day was more complete. Ginger is always a good idea. Like bacon. Except bacon jelly beans, seriously, don't do it.
Spicy Citrus Coconut Chicken (with Cauliflower Rice)
This made 3 meals for me
Ingredients
1 can coconut milk
2 large chicken breasts
~ 3 tablespoons lime juice
~ 6 clementines (4 juiced, 2 for garnish)
~ 2 teaspoons chili flakes (more or less depending on your level of spiciness)
fresh ginger
a pinch of cumin (if you like that sort of thing)
1/2 head of cauliflower
leaks or onion
other veggies? (red bell peppers or snap peas, mayhaps?)
1. Sear the chicken breasts on both sides in olive/coconut oil for a couple of minutes and set aside.
2. Chop and saute the onion or leaks briefly. Also saute sliced peppers here, like I forgot to do.
3. Add coconut milk, ginger, lime juice, clementine juice, cumin (optional), salt to taste, and chili flakes. I recommend adding a small amount of the chili flakes at a time and taste testing, because the hotness seems to intensify as you go along. I put a bit too much for my liking.
4. Put the lid on and let simmer while you "rice the cauliflower" in your handy dandy hand crank food processor, or your electric one if you're one of those fancy folk.
5. I added my cauliflower to the sauce at this point to let it cook. Ashley tried this recipe after smelling my leftovers, and cooked hers a bit separately first with some chicken broth, then added it to the sauce at the end. Either way, the point is to get your cauliflower cooked somehow, so long as it ends up in the sauce at the end, because I've decided it's better that way.
6. Slice the chicken into bite sized pieces and add back into the sauce to finish cooking.
7. Add some clementine wedges, if you please, and serve! Ashley also added orange juice to her sauce concoction, by the way, and something else but I don't remember what....hm....oh well!
Spicy Citrus Coconut Chicken (with Cauliflower Rice)
This made 3 meals for me
Ingredients
1 can coconut milk
2 large chicken breasts
~ 3 tablespoons lime juice
~ 6 clementines (4 juiced, 2 for garnish)
~ 2 teaspoons chili flakes (more or less depending on your level of spiciness)
fresh ginger
a pinch of cumin (if you like that sort of thing)
1/2 head of cauliflower
leaks or onion
other veggies? (red bell peppers or snap peas, mayhaps?)
1. Sear the chicken breasts on both sides in olive/coconut oil for a couple of minutes and set aside.
2. Chop and saute the onion or leaks briefly. Also saute sliced peppers here, like I forgot to do.
3. Add coconut milk, ginger, lime juice, clementine juice, cumin (optional), salt to taste, and chili flakes. I recommend adding a small amount of the chili flakes at a time and taste testing, because the hotness seems to intensify as you go along. I put a bit too much for my liking.
4. Put the lid on and let simmer while you "rice the cauliflower" in your handy dandy hand crank food processor, or your electric one if you're one of those fancy folk.
5. I added my cauliflower to the sauce at this point to let it cook. Ashley tried this recipe after smelling my leftovers, and cooked hers a bit separately first with some chicken broth, then added it to the sauce at the end. Either way, the point is to get your cauliflower cooked somehow, so long as it ends up in the sauce at the end, because I've decided it's better that way.
6. Slice the chicken into bite sized pieces and add back into the sauce to finish cooking.
7. Add some clementine wedges, if you please, and serve! Ashley also added orange juice to her sauce concoction, by the way, and something else but I don't remember what....hm....oh well!
Labels:
cauliflower,
chicken,
chili flakes,
clementines,
coconut milk,
ginger,
lime,
rice,
spicy
Wednesday, 4 January 2012
Banana Curry Chicken on Cauliflower Rice
You know what's awesome? Cauliflower rice. You know what else is awesome? Kitchen gadgets that can chop the cauliflower without it flying all over the kitchen. The first time I made the stuff I tried just chopping it, with the result that I had to actually sweep the floor afterward. I also tried grating on the mandoline, but cauliflower is too structurally unsound and, again, ended up all over the kitchen.
BUT THEN for Christmas mum got me a hand crank food processor thinger, in which the cauliflower was contained while I mulched it into rice format. AMAZING! Also, much cheaper than the fancy electric food processors.
Cauliflower rice is a really excellent substitute vessel for your meats and sauces. The texture is similar to rice, and it soaks up sauce flavours nicely so that the cauliflower taste is not overpowering (which is good, because I happen to think cauliflower is gross). It's also easy to make, albeit quite messy without the proper tools (thanks mom!!). I've tried it with a few different curries. I hadn't ever made curry in my previous life so I'm still trying to find a recipe that tastes as good as my favourite Indian restaurant (next time, I'm trying something with pineapple!). This recipe is the best one I've found so far, and was pretty darn tasty. Original recipe here.
Banana Curry Chicken
Ingredients
Sliced veggies (bell pepper, carrots, zuccini, etc)
Chicken breasts
Sea salt and fresh ground black pepper, to taste
1 large banana, peeled
1/2 cup light coconut milk
2 large scallions, sliced
1 tsp curry powder
1/2 tsp ground turmeric
1/4 tsp ground cinnamon
1/8 tsp ground cayenne pepper
1 tbsp grated fresh ginger
Fresh chopped cilantro, for garnish
1. Preheat oven to 425ºF. Place sliced vegetables and a chicken breast on a piece of foil. Season chicken with salt and black pepper.
2. In a blender (or with a fork), add banana, coconut milk, scallions, curry powder, turmeric, cinnamon, cayenne pepper and ginger and process (smoosh) until smooth. Pour banana-coconut milk mixture over each chicken breast, dividing evenly. Seal foil packets, place on a rimmed baking sheet and cook in oven for 22 to 25 minutes. Set aside to cool for a few minutes before opening. (NOTE: I had to cook mine much longer, perhaps they were thicker).
Cauliflower Rice
Mulch up some cauliflower until it's the size of rice grains. As per the discussion above, I recommend some sort of food processor. I haven't tried the blender but it might do. Heat a generous amount of coconut oil in a pan. Stir in the cauliflower to cover with oil. Cook with a lid on medium-low, stiring occasionally, until the cauliflower is the desired squishiness. I do mine for 15 minutes or so.
BUT THEN for Christmas mum got me a hand crank food processor thinger, in which the cauliflower was contained while I mulched it into rice format. AMAZING! Also, much cheaper than the fancy electric food processors.
Cauliflower rice is a really excellent substitute vessel for your meats and sauces. The texture is similar to rice, and it soaks up sauce flavours nicely so that the cauliflower taste is not overpowering (which is good, because I happen to think cauliflower is gross). It's also easy to make, albeit quite messy without the proper tools (thanks mom!!). I've tried it with a few different curries. I hadn't ever made curry in my previous life so I'm still trying to find a recipe that tastes as good as my favourite Indian restaurant (next time, I'm trying something with pineapple!). This recipe is the best one I've found so far, and was pretty darn tasty. Original recipe here.
Banana Curry Chicken
Ingredients
Sliced veggies (bell pepper, carrots, zuccini, etc)
Chicken breasts
Sea salt and fresh ground black pepper, to taste
1 large banana, peeled
1/2 cup light coconut milk
2 large scallions, sliced
1 tsp curry powder
1/2 tsp ground turmeric
1/4 tsp ground cinnamon
1/8 tsp ground cayenne pepper
1 tbsp grated fresh ginger
Fresh chopped cilantro, for garnish
1. Preheat oven to 425ºF. Place sliced vegetables and a chicken breast on a piece of foil. Season chicken with salt and black pepper.
2. In a blender (or with a fork), add banana, coconut milk, scallions, curry powder, turmeric, cinnamon, cayenne pepper and ginger and process (smoosh) until smooth. Pour banana-coconut milk mixture over each chicken breast, dividing evenly. Seal foil packets, place on a rimmed baking sheet and cook in oven for 22 to 25 minutes. Set aside to cool for a few minutes before opening. (NOTE: I had to cook mine much longer, perhaps they were thicker).
Cauliflower Rice
Mulch up some cauliflower until it's the size of rice grains. As per the discussion above, I recommend some sort of food processor. I haven't tried the blender but it might do. Heat a generous amount of coconut oil in a pan. Stir in the cauliflower to cover with oil. Cook with a lid on medium-low, stiring occasionally, until the cauliflower is the desired squishiness. I do mine for 15 minutes or so.
Labels:
banana,
cauliflower,
cayenne,
chicken,
cinnamon,
coconut milk,
curry,
ginger,
turmeric
Friday, 30 December 2011
Zucchini Linguine and other noodle substitutes
So, Christmas happened, and I fell off the paleo wagon in a big way. To be fair to myself, that was my intention. After completing a 10 week paleo challenge on December 23rd, during which I had only a handful of (mostly non-glutenous) cheats, I went home to mom's in London and I ate. A lot. Indiscriminately. I'll excuse myself for the gluten and sugar-filled Christmas dinner under my self-composed Plan to Cheat clause. For the rest of the holiday, I have no defense, except perhaps that gluten from mom's house doesn't count?
Climbing back aboard the paleo wagon is going to be made somewhat more difficult by the fact that I did not experience any immediate negative feedback from stuffing my face with...well stuffing. I did, however, experience several delayed consequences. The first was what I can only assume to be one mad sugar hangover (imagine feeling like you've been drinking all night, without the pleasure of a single glass of wine). In addition, my performance upon returning to the gym has been rather sub-par (I haven't been winded after a 500m warmup row in some time...)
I had planned to share the recipes from our pre-Christmas paleo cookie exchange, but in light of my recent vegetable cravings, I've decided my body has the right idea; the cookies can wait for another day. Instead, I'm sharing my favourite pasta substitutes. Pasta, as I see it, is really just a vessel for the sauce (with the possible exception of fresh, made from scratch noodles with nothing but parmesan, butter, and salt/pepper, but I digress). If you've been missing spaghetti, these substitutes are very tasty and often satisfy my noodle-type cravings.
Paleo Pasta
My favourite paleo "noodle" is spaghetti squash (pictured to the left). Cleave the squash lengthwise in half, scoop out the seeds, and bake face down for about 30 min or until a fork pierces the skin. Scrape out the innards with a fork and you've got spaghetti! Bonus: toss the cleaned seeds in olive oil and seasalt and toast in the oven for a tasty snack.
Zuccini is the next best noodle (on the right, with a tomato and cream cheese rose sauce and crumbled sausage). You can slice it with a mandoline for more spaghetti type noodles, or use a vegetable peeler lengthwise to make lingine. I've seen directions that suggest you saute or boil the noodes, but I find that if the sauce is hot enough you can just pour it on the raw noodles and they heat up sufficiently.
The last subsitute I've tried is chopped cabbage. It was hardly pasta-like in texture, but served as a handy vessel for my meatsauce one evening when I was feeling lazy.
Go nuts with your favourite sauce. I've put a couple suggestions below.
My version of a Meat Sauce
1. Brown ground beef or sausage in a large pan.
2. Add things that need sauteing like mushrooms, onions, peppers, carrots, and/or garlic
3. Add a diced tomato or 2 or three. Probaby you'd add tomato paste here, if you had that sort of thing, which I usually don't.
4. Season: I use lots of paprika and chili powder, salt and pepper, oregano and any other herb I feel like that day.
5. Simmer. Sometimes I add a bit of water. I usually leave the lid on for a bit to let the flavours distribute, and then leave the lid off to reduce moisture.
6. Sometimes I put a bit of red wine.
Usually by the time my squash is done baking, or I've finished making zucchini noodles, the sauce is ready to serve!
Creamy Mushroom Sauce
I haven't tried this exact recipe, but I made a similar tasty sauce for some porkchops and this one looks tastier (from Family Living Simple).
Ingredients
2 Tablespoons of Ghee or coconut oil
3 Cloves of Garlic
1 Cup of Mushrooms sliced
1/2 Onion chopped
1 Cup Coconut Milk (Full Fat)
1/4 Cup White wine
Pepper
Parsley
Heat the butter in a pan over medium heat. Add the onions and cook until transluscent. Add the chopped Garlic and cook a few more minutes. Add the mushrooms. Mix everything up really well to make sure to coat all the mushrooms. Continue to cook for 3-5 more minutes. Add the wine and make sure it boils to cook off the alcohol. Turn the heat down to Medium low and add in the coconut milk. Add spices and let the sauce thicken a little bit and then remove from heat.
They served their sauce on steak but it looked like an excellent pasta sauce to me! Let me know if you try it.
Climbing back aboard the paleo wagon is going to be made somewhat more difficult by the fact that I did not experience any immediate negative feedback from stuffing my face with...well stuffing. I did, however, experience several delayed consequences. The first was what I can only assume to be one mad sugar hangover (imagine feeling like you've been drinking all night, without the pleasure of a single glass of wine). In addition, my performance upon returning to the gym has been rather sub-par (I haven't been winded after a 500m warmup row in some time...)
I had planned to share the recipes from our pre-Christmas paleo cookie exchange, but in light of my recent vegetable cravings, I've decided my body has the right idea; the cookies can wait for another day. Instead, I'm sharing my favourite pasta substitutes. Pasta, as I see it, is really just a vessel for the sauce (with the possible exception of fresh, made from scratch noodles with nothing but parmesan, butter, and salt/pepper, but I digress). If you've been missing spaghetti, these substitutes are very tasty and often satisfy my noodle-type cravings.
Paleo Pasta
My favourite paleo "noodle" is spaghetti squash (pictured to the left). Cleave the squash lengthwise in half, scoop out the seeds, and bake face down for about 30 min or until a fork pierces the skin. Scrape out the innards with a fork and you've got spaghetti! Bonus: toss the cleaned seeds in olive oil and seasalt and toast in the oven for a tasty snack.
Zuccini is the next best noodle (on the right, with a tomato and cream cheese rose sauce and crumbled sausage). You can slice it with a mandoline for more spaghetti type noodles, or use a vegetable peeler lengthwise to make lingine. I've seen directions that suggest you saute or boil the noodes, but I find that if the sauce is hot enough you can just pour it on the raw noodles and they heat up sufficiently.
The last subsitute I've tried is chopped cabbage. It was hardly pasta-like in texture, but served as a handy vessel for my meatsauce one evening when I was feeling lazy.
Go nuts with your favourite sauce. I've put a couple suggestions below.
My version of a Meat Sauce
1. Brown ground beef or sausage in a large pan.
2. Add things that need sauteing like mushrooms, onions, peppers, carrots, and/or garlic
3. Add a diced tomato or 2 or three. Probaby you'd add tomato paste here, if you had that sort of thing, which I usually don't.
4. Season: I use lots of paprika and chili powder, salt and pepper, oregano and any other herb I feel like that day.
5. Simmer. Sometimes I add a bit of water. I usually leave the lid on for a bit to let the flavours distribute, and then leave the lid off to reduce moisture.
6. Sometimes I put a bit of red wine.
Usually by the time my squash is done baking, or I've finished making zucchini noodles, the sauce is ready to serve!
Creamy Mushroom Sauce
I haven't tried this exact recipe, but I made a similar tasty sauce for some porkchops and this one looks tastier (from Family Living Simple).
Ingredients
2 Tablespoons of Ghee or coconut oil
3 Cloves of Garlic
1 Cup of Mushrooms sliced
1/2 Onion chopped
1 Cup Coconut Milk (Full Fat)
1/4 Cup White wine
Pepper
Parsley
Heat the butter in a pan over medium heat. Add the onions and cook until transluscent. Add the chopped Garlic and cook a few more minutes. Add the mushrooms. Mix everything up really well to make sure to coat all the mushrooms. Continue to cook for 3-5 more minutes. Add the wine and make sure it boils to cook off the alcohol. Turn the heat down to Medium low and add in the coconut milk. Add spices and let the sauce thicken a little bit and then remove from heat.
They served their sauce on steak but it looked like an excellent pasta sauce to me! Let me know if you try it.
Labels:
beef,
chili powder,
coconut milk,
mushrooms,
noodles,
paprika,
sausage,
spaghetti squash,
zucchini
Wednesday, 9 November 2011
Banana Macaroon Pie
I've hated bananas for as long as I can remember. The texture really grosses me out (and also Mom says I had some sort of banana related incident as a child). But since bananas are a very convenient snack (they come in their own container!), and work so well in smoothies, I decided to give them another try. As I'm finding with many things that I've previously resisted due to unpleasant texture (like broccoli...it's fuzzy...) if you disguise it at first, you can make it edible (often with bacon), and eventually you even get used to it. Recently, I've embraced the banana, and it has become a part of my new favourite dessert:
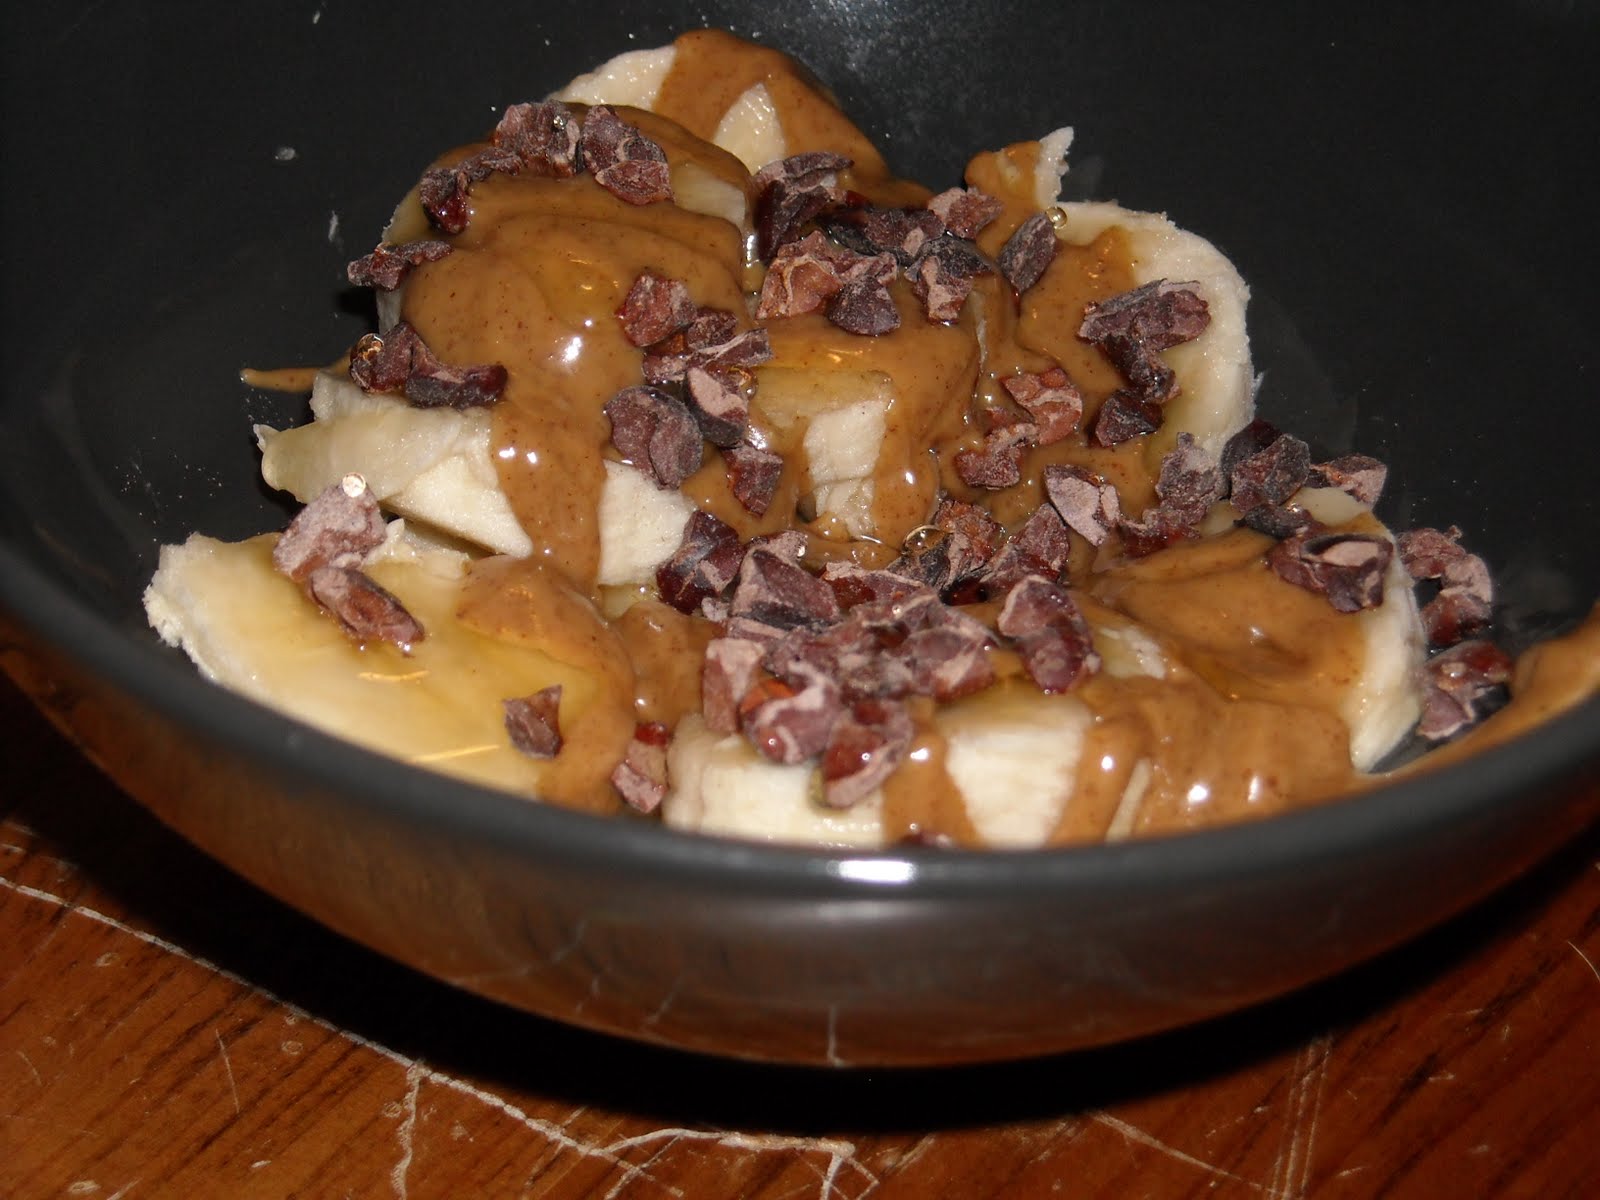
Banana Sundae(ish)
Sliced banana (1/2 to 1 whole, hunger dependent), drizzled with almond butter and a bit of honey, and sprinkled with cocoa nibs.
The day after inventing this banana camouflage (and just one week into the 10 week paleo challenge), I was confronted with an invitation to a birthday dinner involving double chocolate cake. Keeping in mind my "plan to not cheat" motto I decided to make my own dessert to bring along. My manfriend suggested I make something to share, and proposed that I make my banana sundae into a pie to "make it look less healthy so that other people will try it". Google found me this recipe, which I modified (ditched the strawberries and replaced the crust with something chocolatey) to create the masterpiece below.
Banana Macaroon Pie
Crust
3/4 cup blanched almond flour
1/4 teaspoon sea salt
1/2 cup unsweetened shredded coconut, toasted
1/4 cup cocoa
1/4 cup coconut oil, melted over low heat
1 tablespoon honey
1 teaspoon vanilla extract
Filling
2 ripe bananas
1 tbsp lemon juice
½ tsp vanilla extract
3 eggs, beaten
2/3 c. coconut milk
honey and cocoa nibs for the top
The crust is modified from Elana's Gluten-free Almond Flour cookbook. Her crusts are all variations on a theme. I adjusted her coconut pie crust to make it chocolatey, although I think I would put a bit more coconut/almond flour and a bit less cocoa next time.
1. Combine dry ingredients in one bowl, whisk the wet in another bowl, and stir the wet into the dry.
2. Press into a 9 1/2" pie pan.
3.(?) I then baked it at 350 for 10 minutes (without the filling), but realized afterward that this was probably unnecessary; Alana's crust recipe was for a pie with chilled filling (and thus needed separate baking), and the original banana pie recipe did not pre-bake the crust. Thus, the top edges were a little crispy, so I'll try without pre-baking next time (there's nothing in it that really needs baking anyway).
4. Mix bananas, lemon juice, and vanilla extract either in a food processor or by hand (you’ll need to mash the bananas first if you mix by hand). Then gently mix in coconut milk and eggs.
3. Pour banana filling into pie crust.
4. Bake at 180 C for 35 minutes, or until set in center. Let pie cool.
5. Drizzle honey and sprinkle cocoa nibs on top (or stick with the strawberries and blueberries suggested in the original recipe).
Note: other people actually ate it, and took a second slice for later!
Banana Sundae(ish)
Sliced banana (1/2 to 1 whole, hunger dependent), drizzled with almond butter and a bit of honey, and sprinkled with cocoa nibs.
The day after inventing this banana camouflage (and just one week into the 10 week paleo challenge), I was confronted with an invitation to a birthday dinner involving double chocolate cake. Keeping in mind my "plan to not cheat" motto I decided to make my own dessert to bring along. My manfriend suggested I make something to share, and proposed that I make my banana sundae into a pie to "make it look less healthy so that other people will try it". Google found me this recipe, which I modified (ditched the strawberries and replaced the crust with something chocolatey) to create the masterpiece below.
Banana Macaroon Pie
Crust
3/4 cup blanched almond flour
1/4 teaspoon sea salt
1/2 cup unsweetened shredded coconut, toasted
1/4 cup cocoa
1/4 cup coconut oil, melted over low heat
1 tablespoon honey
1 teaspoon vanilla extract
Filling
2 ripe bananas
1 tbsp lemon juice
½ tsp vanilla extract
3 eggs, beaten
2/3 c. coconut milk
honey and cocoa nibs for the top
The crust is modified from Elana's Gluten-free Almond Flour cookbook. Her crusts are all variations on a theme. I adjusted her coconut pie crust to make it chocolatey, although I think I would put a bit more coconut/almond flour and a bit less cocoa next time.
1. Combine dry ingredients in one bowl, whisk the wet in another bowl, and stir the wet into the dry.
2. Press into a 9 1/2" pie pan.
3.(?) I then baked it at 350 for 10 minutes (without the filling), but realized afterward that this was probably unnecessary; Alana's crust recipe was for a pie with chilled filling (and thus needed separate baking), and the original banana pie recipe did not pre-bake the crust. Thus, the top edges were a little crispy, so I'll try without pre-baking next time (there's nothing in it that really needs baking anyway).
4. Mix bananas, lemon juice, and vanilla extract either in a food processor or by hand (you’ll need to mash the bananas first if you mix by hand). Then gently mix in coconut milk and eggs.
3. Pour banana filling into pie crust.
4. Bake at 180 C for 35 minutes, or until set in center. Let pie cool.
5. Drizzle honey and sprinkle cocoa nibs on top (or stick with the strawberries and blueberries suggested in the original recipe).
Note: other people actually ate it, and took a second slice for later!
Labels:
almond flour,
banana,
cocoa,
cocoa nibs,
coconut,
coconut milk,
coconut oil,
dessert,
eggs,
lemon juice,
pie,
vanilla
Subscribe to:
Posts (Atom)